
User Guide
ECIS Mentoring Platform
A complete guide for mentors and mentees — from creating an account through to messaging, booking sessions and leaving feedback.
Platform
mentoring.ecis.org
Version
1.0
Date
4th August, 2026
Contact
mentoring@ecis.org
Contents
Table of Contents
Document Control
Version Information & Changes
Any changes, edits and updates made to this user guide will be recorded here. Whenever there is an update to this user guide, ECIS requires that the version number be updated to indicate this.
| Name | Role | Date of change | Version | Notes |
|---|---|---|---|---|
| Mohammed Chaudhry | IT & Data Manager | 4th August, 2026 | 1.0 | First release |
Section 01
Introduction
1.1 What is ECIS Mentoring↑
ECIS Mentoring is a dedicated platform for connecting mentors and mentees across the ECIS community, designed to make mentoring relationships easy to start, manage, and grow — from finding the right match through to messaging and, in time, scheduling sessions.
1.2 Who this guide is for↑
This guide covers everything you need to know as either a mentor or a mentee using the platform, from setting up your account through to messaging your match. Sections that apply to only one role are clearly marked; everything else applies to both.
1.3 How mentoring works↑
Mentoring is the practice of sharing knowledge, skills, and experience to support another person's professional growth. Unlike coaching, which tends to focus on set goals over a short, structured period, mentoring is more flexible and longer-term, shaped around the mentee's own career goals.
There's no fixed length for a mentoring relationship — some run for a few months, others for a few years — but a good starting point is to plan for around six months, then reassess. Meeting once a month is a reasonable default cadence, though this is best agreed between mentor and mentee directly, and may vary depending on whether you're working on a specific short-term challenge or a longer-term goal.
Section 02
Getting Started
2.1 Creating an account↑
- From the homepage (mentoring.ecis.org), click Sign In in the top right.
- On the sign-in screen, click Register (below the sign-in form).
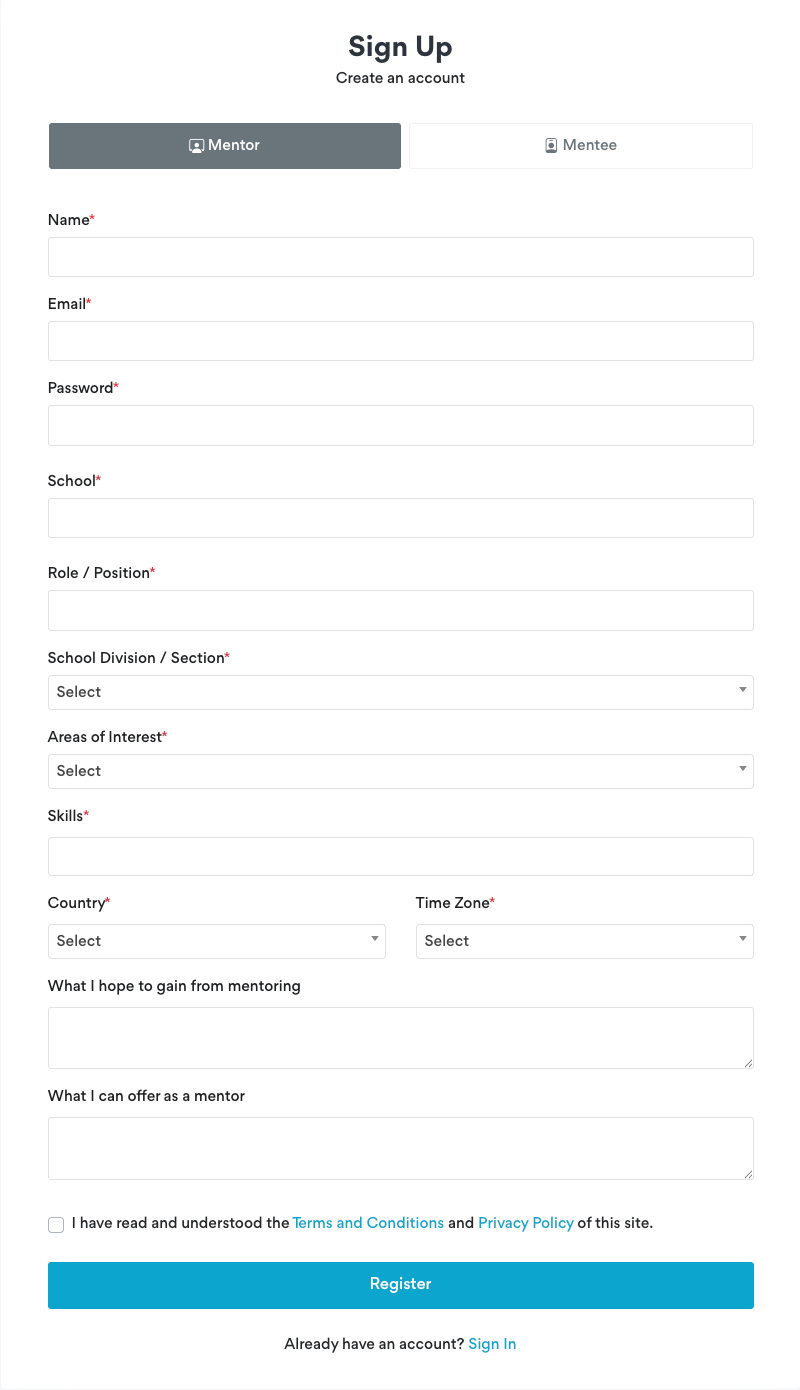
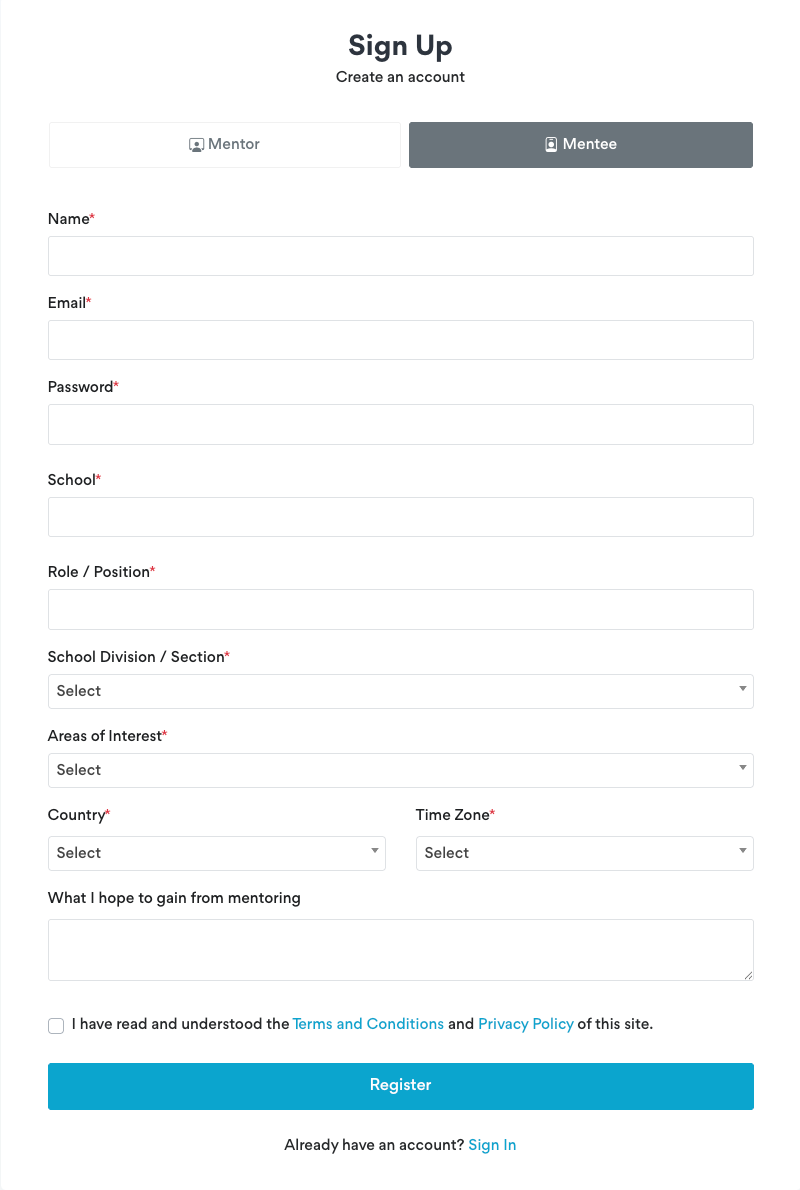
- On the Sign Up page, choose whether you're registering as a Mentor or a Mentee using the toggle at the top of the form. This determines which fields you'll be asked to complete and how you'll appear on the platform — you cannot switch roles later without registering a new account.
- Complete the registration form (see field list below).
- Tick the box to confirm you've read the Terms and Conditions and Privacy Policy.
- Click Register.
2.2 Registration fields — common to both roles↑
- Name (required)
- Email (required)
- Password (required)
- School (required)
- Role / Position (required)
- School Division / Section (required, dropdown)
- Areas of Interest (required, dropdown)
- Country (required, dropdown)
- Time Zone (required, dropdown)
2.3 Additional fields for Mentors↑
- Skills (required)
- “What I can offer as a mentor” (optional, free text — worth completing in full, as this helps mentees decide whether to request you)
2.4 Additional field for Mentees↑
- “What I hope to gain from mentoring” (optional, free text)
2.5 Account approval↑
Registration is not instant access — every new account is reviewed by the ECIS team before it's activated. This keeps the platform exclusive to staff of ECIS member schools.
- After registering, you'll receive a confirmation email letting you know your application is under review.
- The ECIS team reviews the application and responds by email with the outcome, usually within a few days.
- If approved, you'll receive an email with a link to log in and get started.
- If not approved, you'll receive an email explaining why. If you think this was a mistake, or have questions, you can contact ECIS directly at mentoring@ecis.org.
Note
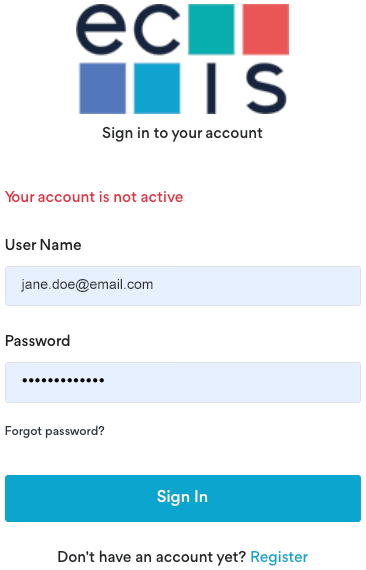
If you try to sign in before your account has been approved, you'll see the message “Your account is not active” on the sign-in screen. This is expected — simply wait for the approval email before trying again.
2.6 Signing in↑
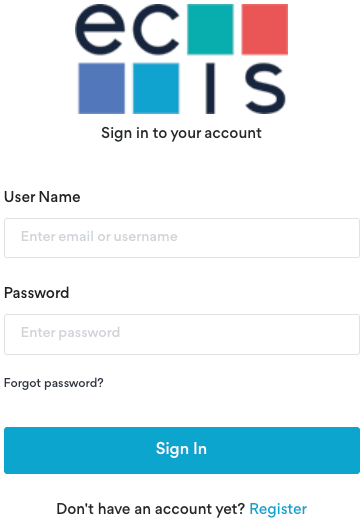
Once your account is approved, sign in from the homepage via Sign In, entering your email/username and password. Use Forgot password? on this screen if you need to reset your credentials.
2.7 Your dashboard↑
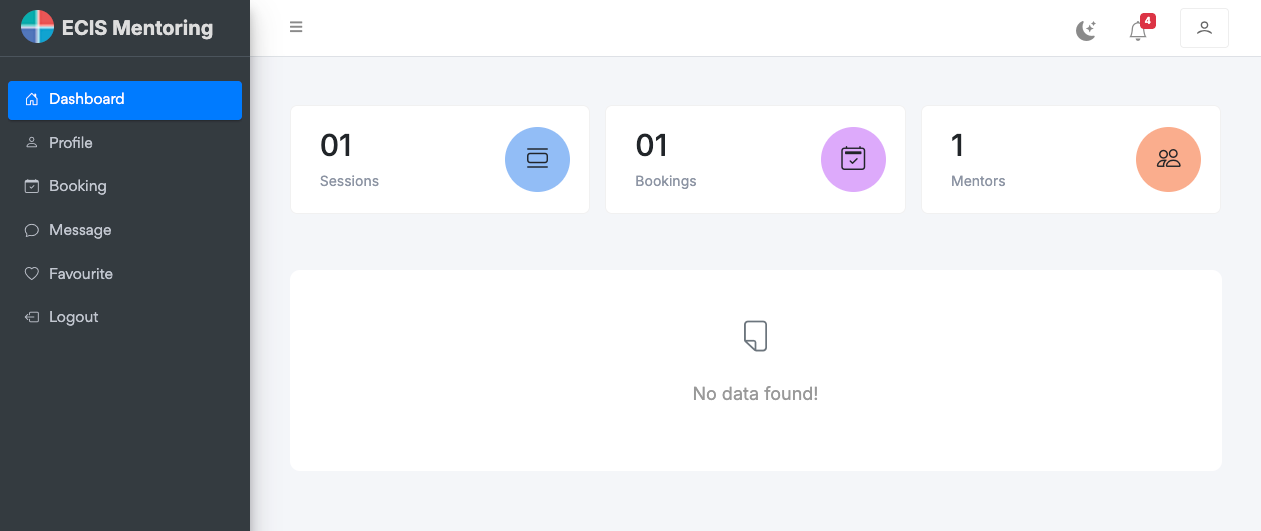
After signing in, you'll land on your Dashboard. For mentees, this shows a quick summary of your Sessions, Bookings, and Mentors, along with the same navigation menu (Profile, Booking, Message, Favourite) used throughout this guide.
Section 03
Your Profile
Most of your profile — School, Role, Areas of Interest, Skills, and your “what I offer / hope to gain” statement — is captured during registration. After that, day-to-day profile editing covers a smaller set of fields, described below.
3.1 Mentee profile↑
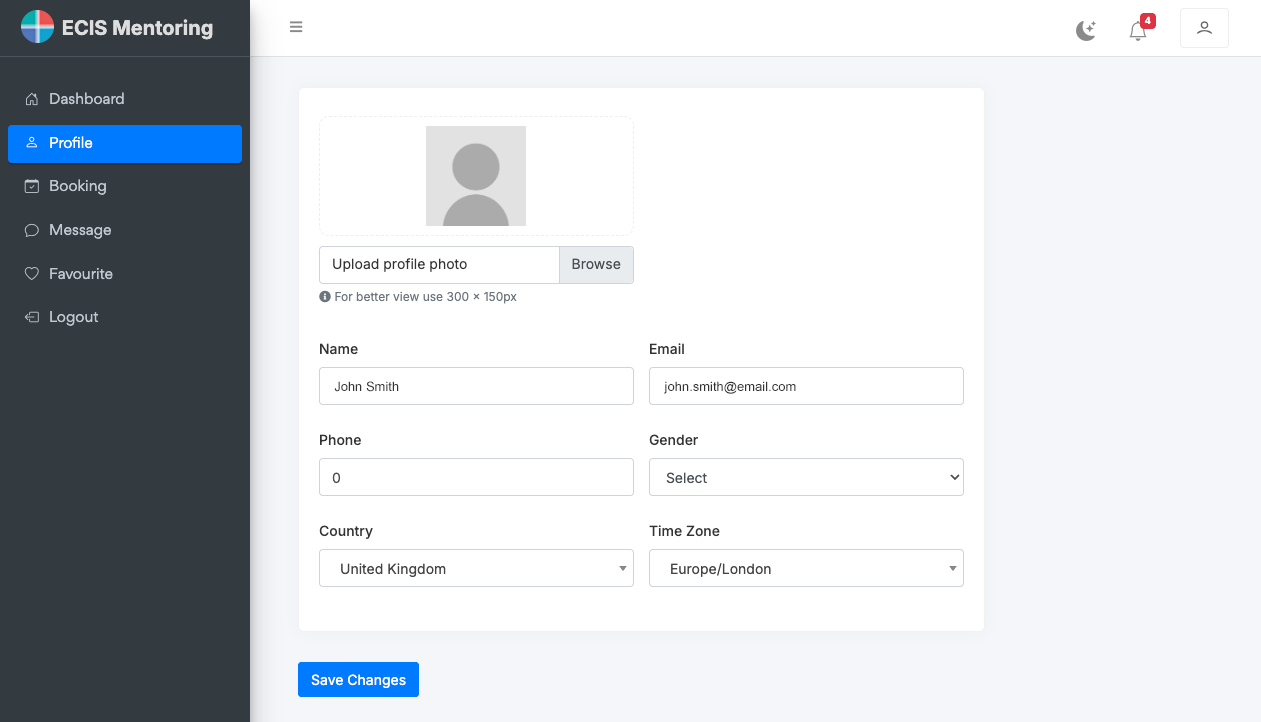
Go to Dashboard ➜ Profile. You can update:
- Profile photo
- Name
- Phone
- Gender
- Country
- Time Zone
Click Save Changes once you're done.
3.2 Mentor profile↑
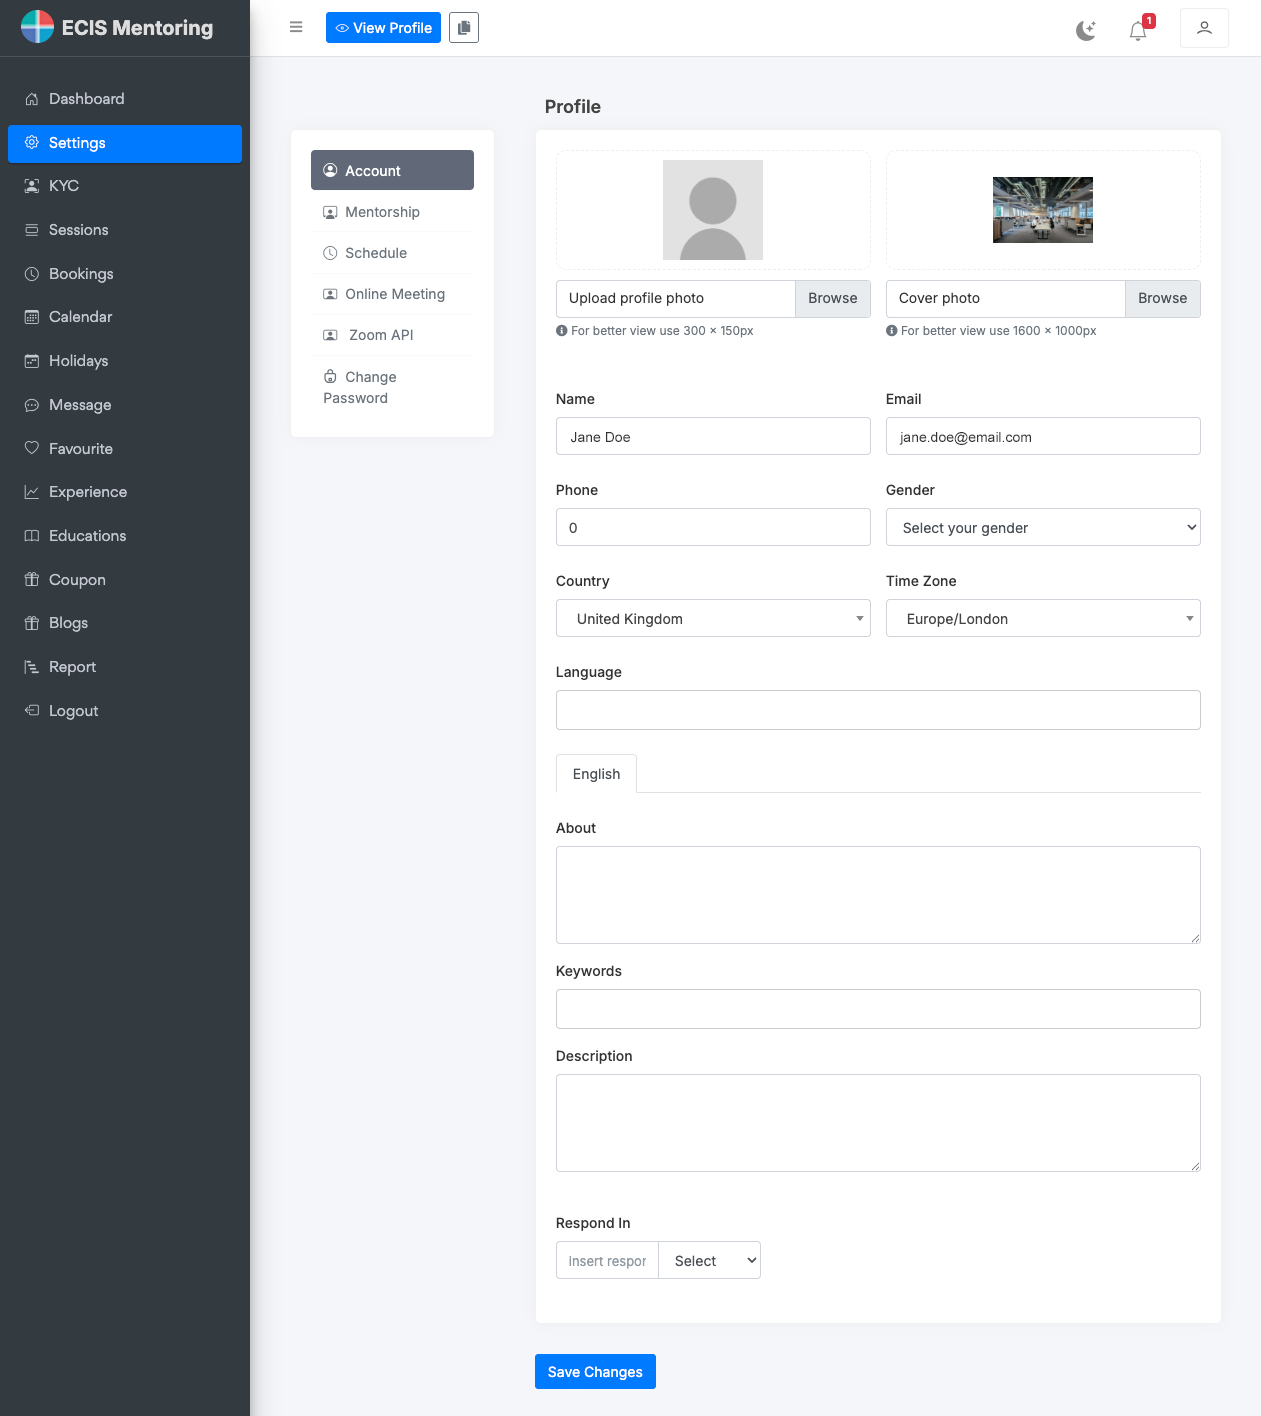
Mentor profile settings are split across several tabs under Dashboard ➜ Settings.
3.2.1 Account tab↑
- Profile photo and cover photo
- Name, Email, Phone, Gender, Country, Time Zone
- Language
- About, Keywords, Description — use these to help mentees understand your background and expertise
- Respond In — sets the expected response time shown on your public profile (e.g. “Usually responds in Hour”)
3.2.2 Schedule tab↑
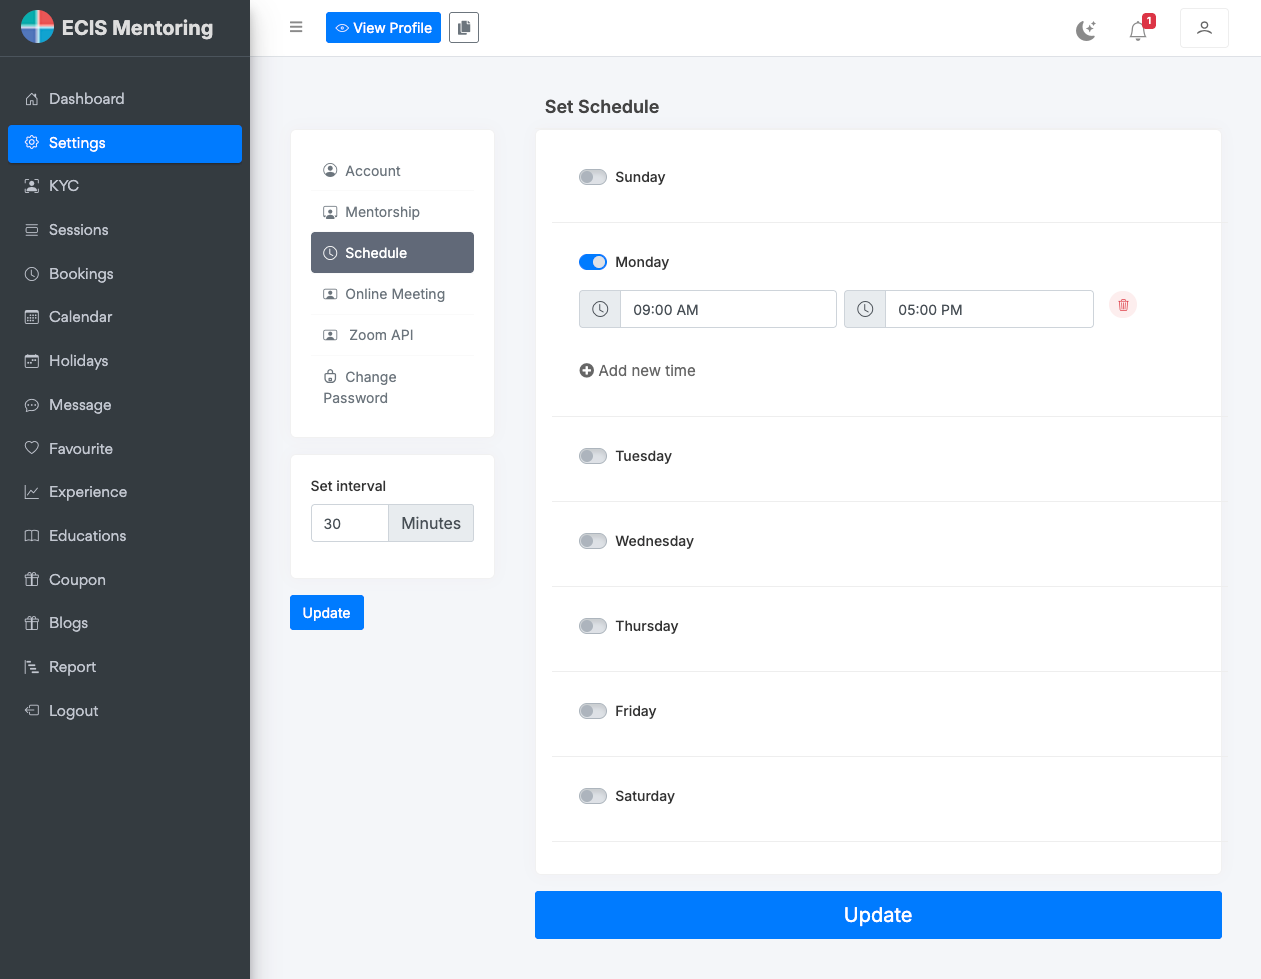
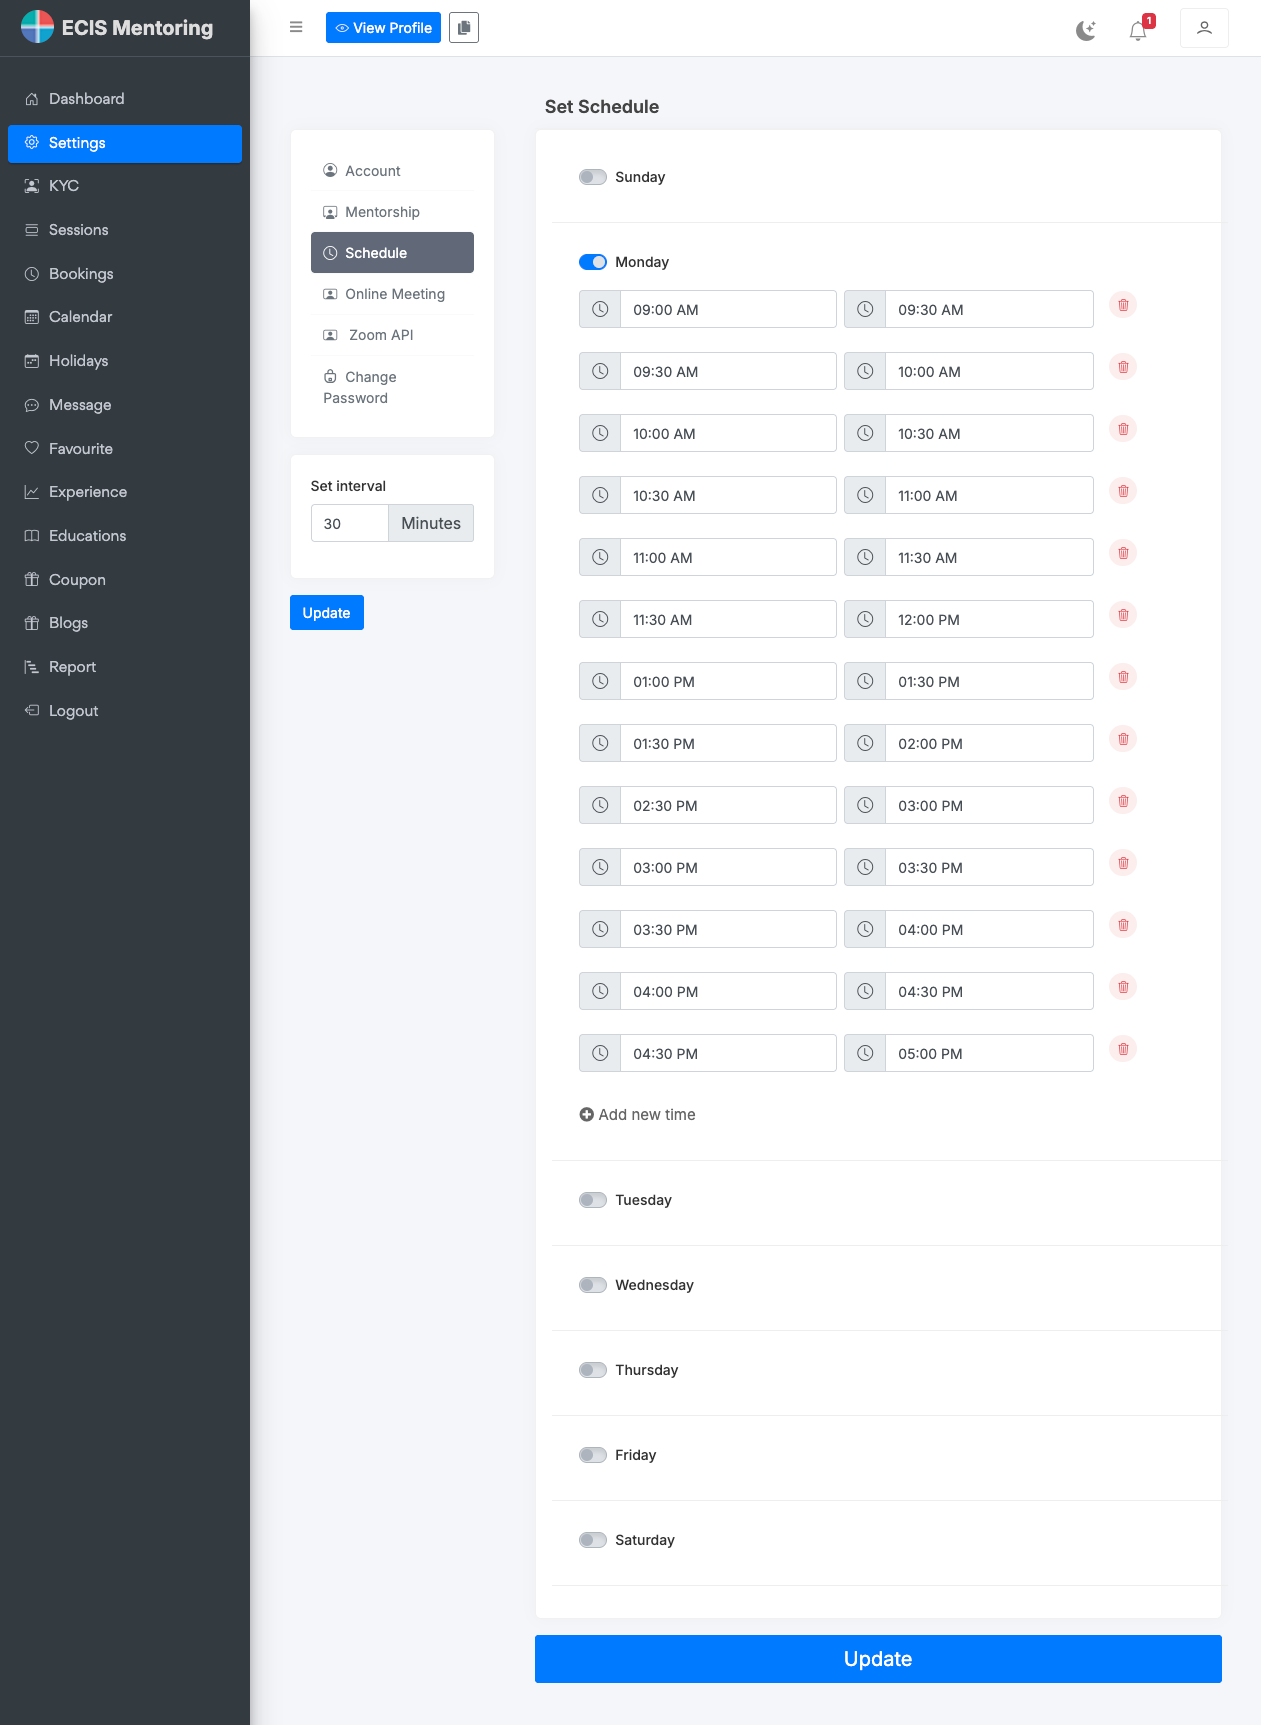
This is where you set your weekly availability for sessions. Toggle on each day you're available, then use Add new time to set a start and end time for that day (e.g. Monday, 9:00 AM–5:00 PM). You can also set a default session interval (in minutes).
Important
Without at least one day enabled here, mentees will not be able to see any bookable time for your sessions. This is easy to overlook when first setting up a mentor account.
3.2.3 Mentorship tab↑
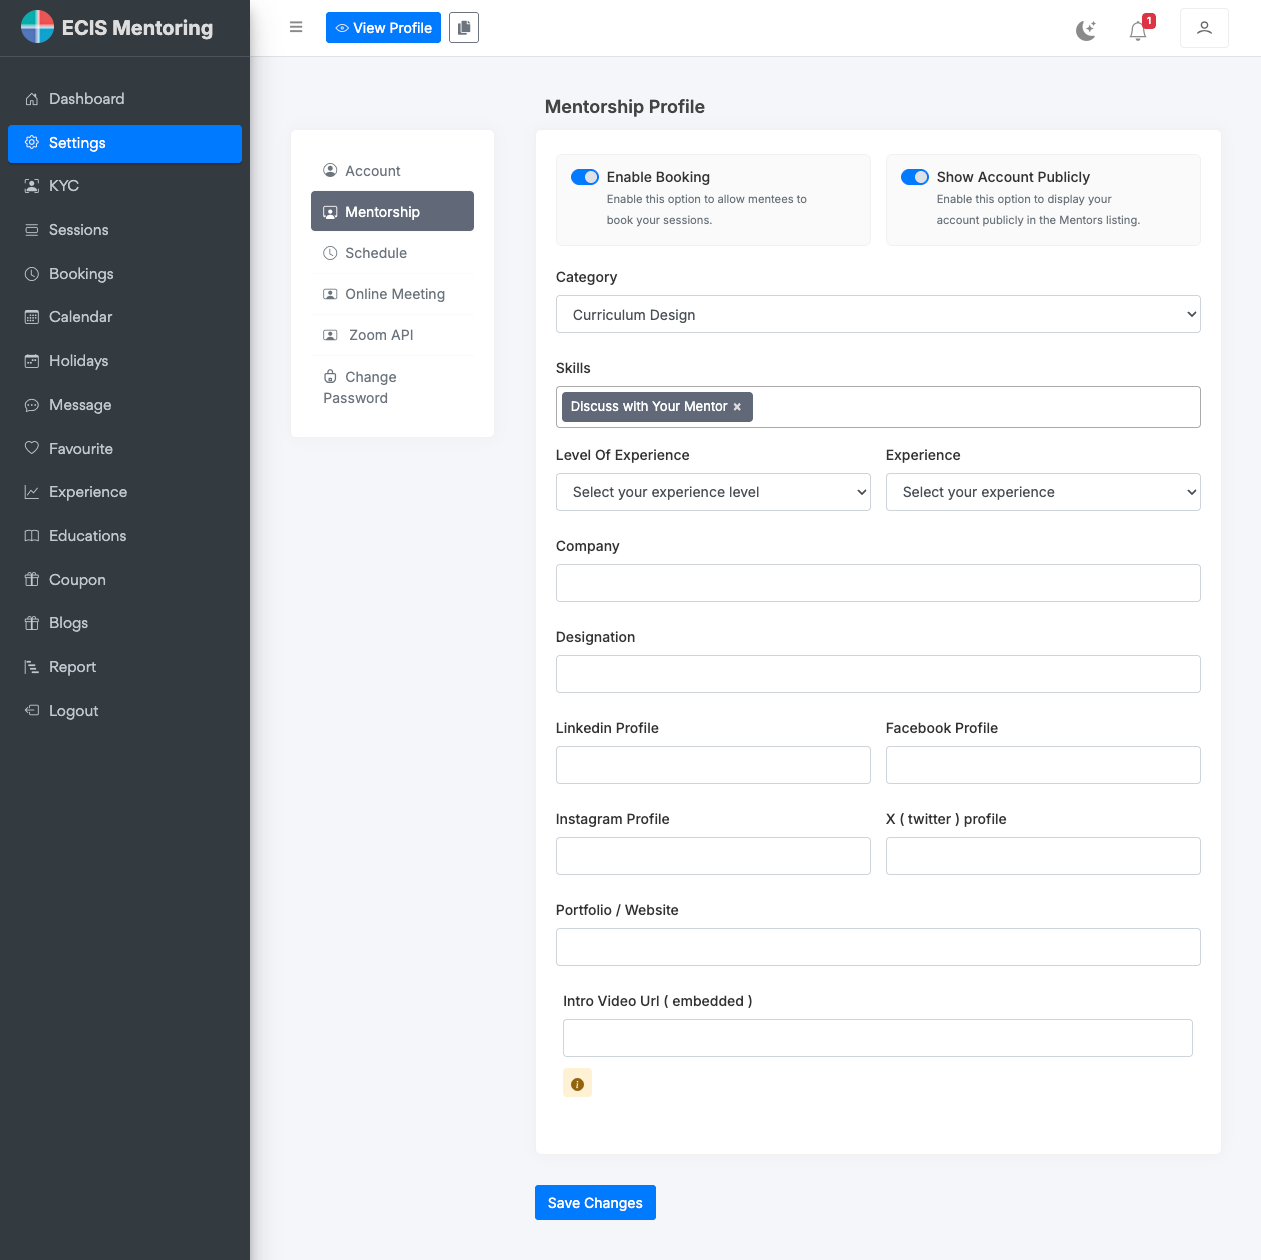
This tab controls whether — and how — you appear to mentees, plus your background details:
- Enable Booking — must be switched on for mentees to be able to book your sessions at all
- Show Account Publicly — must be switched on for your profile to appear in the Mentors directory
- Category — the subject area mentees can filter by when searching for mentors
- Skills, Level of Experience, Experience (years)
- Company, Designation
- LinkedIn, Facebook, Instagram, X (Twitter), and Portfolio/Website links
- Intro Video URL (embedded)
Important
If a mentor isn't showing up in the Mentors directory, or mentees can't book them, check these two toggles first — they're the most common cause.
3.2.4 Online Meeting tab↑
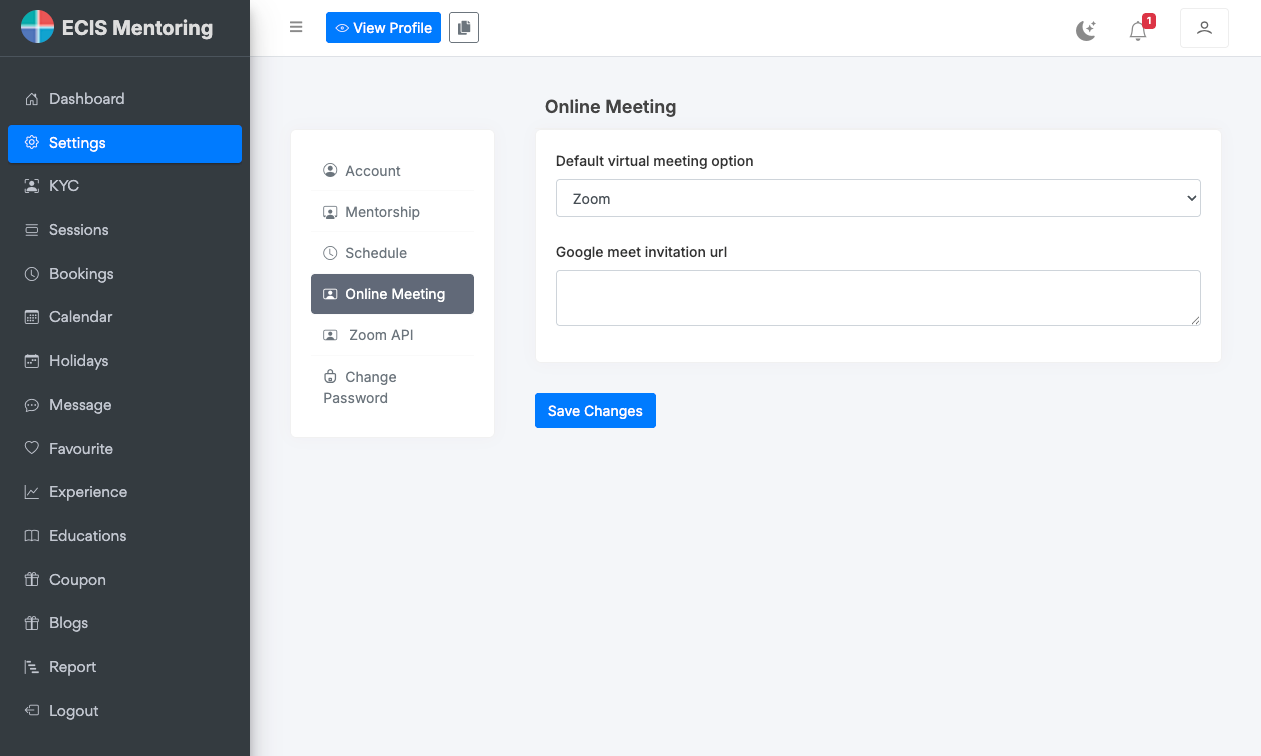
Sets how video sessions are held by default: choose Zoom or Google Meet from the Default virtual meeting option dropdown. If Google Meet is selected, a Google Meet invitation URL field appears for the mentor to provide their own meeting link.
3.2.5 Zoom API tab↑
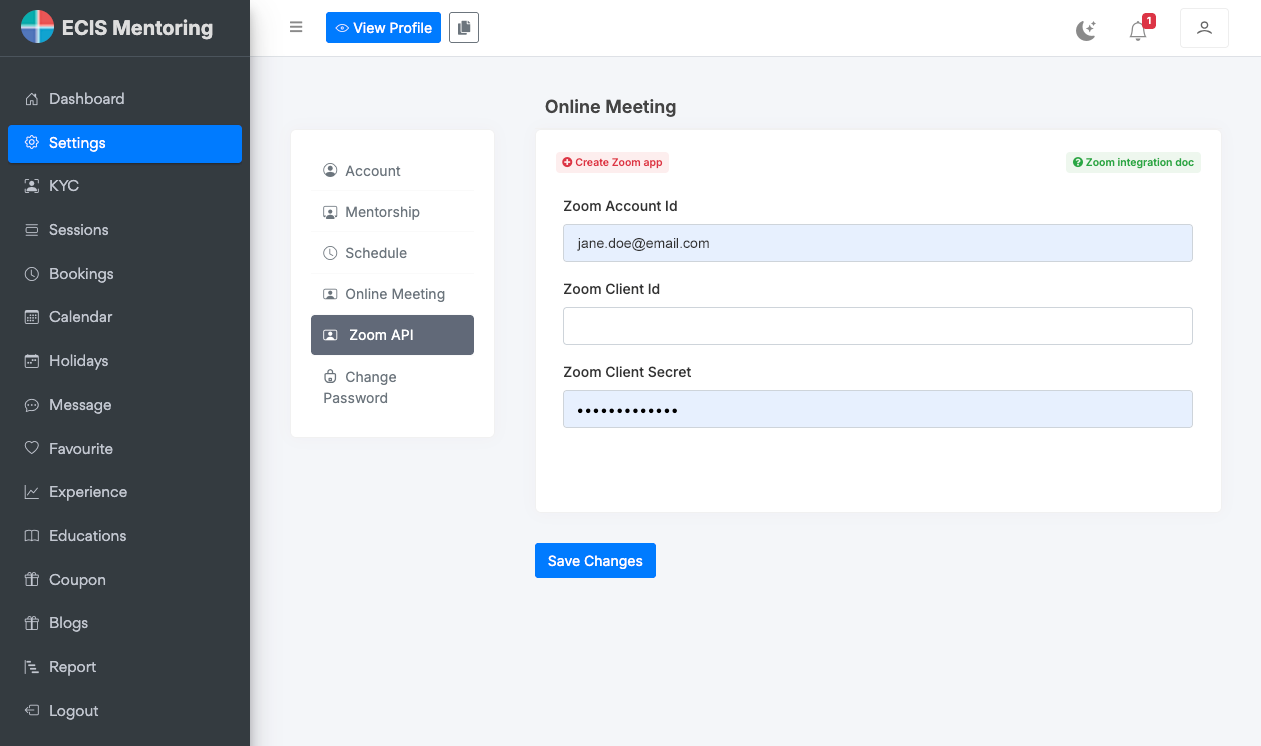
Lets a mentor connect their own Zoom account so sessions can generate Zoom meetings automatically, using Zoom's Server-to-Server OAuth method. This requires creating a Zoom app (a link to do so is provided on this page, along with a link to Zoom's integration documentation) and entering:
- Zoom Account Id
- Zoom Client Id
- Zoom Client Secret
This is a one-off technical setup step and not required if a mentor is happy to use Google Meet instead.
Section 04 · Mentees
Finding a Mentor
4.1 Browsing and searching mentors↑
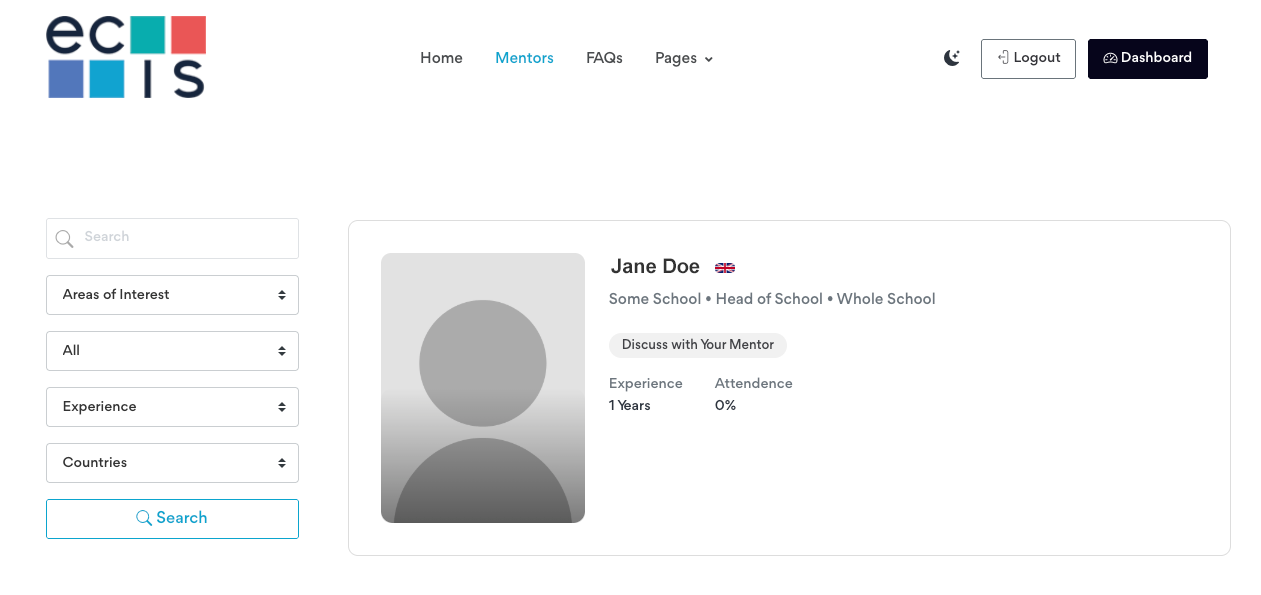
From the main menu, click Mentors, or use the search bar on the homepage. You can filter by:
- Keyword search
- Areas of Interest
- Experience
- Country
4.2 Viewing a mentor's profile↑
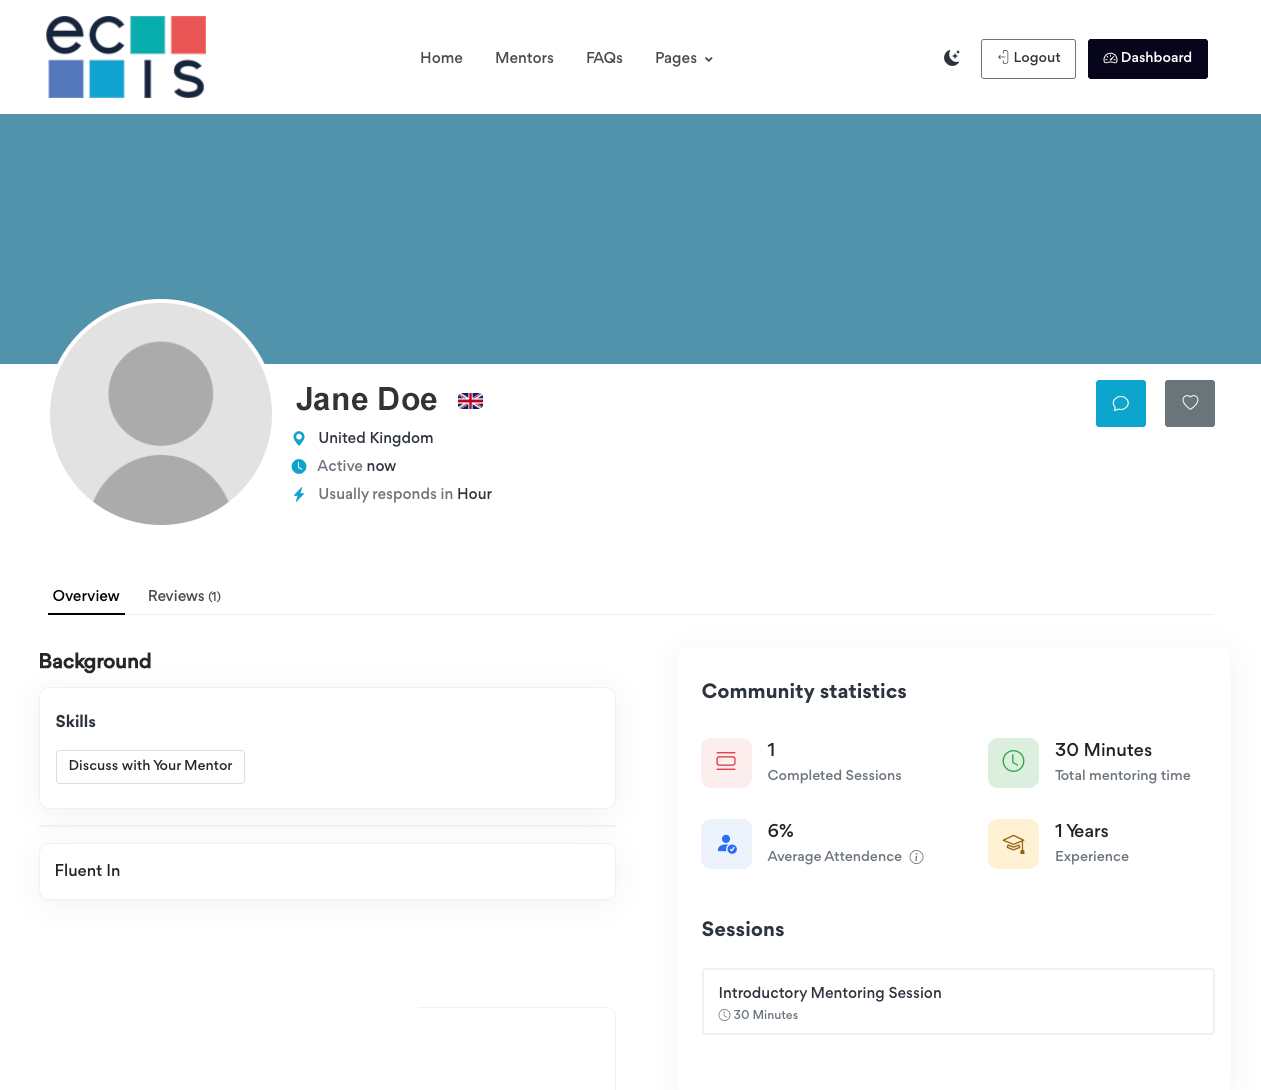
Click through to a mentor's profile to see their background, skills, languages, community statistics (completed sessions, average attendance, experience), and any sessions they currently offer. From here you can:
- Message the mentor (speech-bubble icon)
- Add the mentor to your Favourites (heart icon)
Section 05 · Mentors
Being Found
There is no separate “accept a mentee” step for mentors at this stage — mentees discover you via the Mentors directory and initiate contact by messaging you directly. Keeping your Account tab (About, Keywords, Description, Skills) complete and up to date is the main way to improve how easily mentees can find and choose you.
Section 06
Messaging
Messaging is the primary way mentors and mentees make first contact.
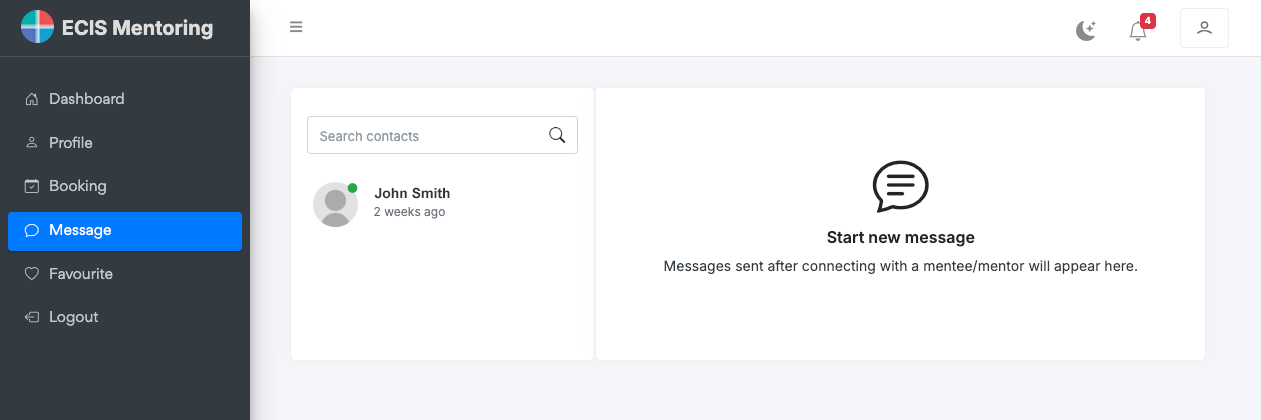
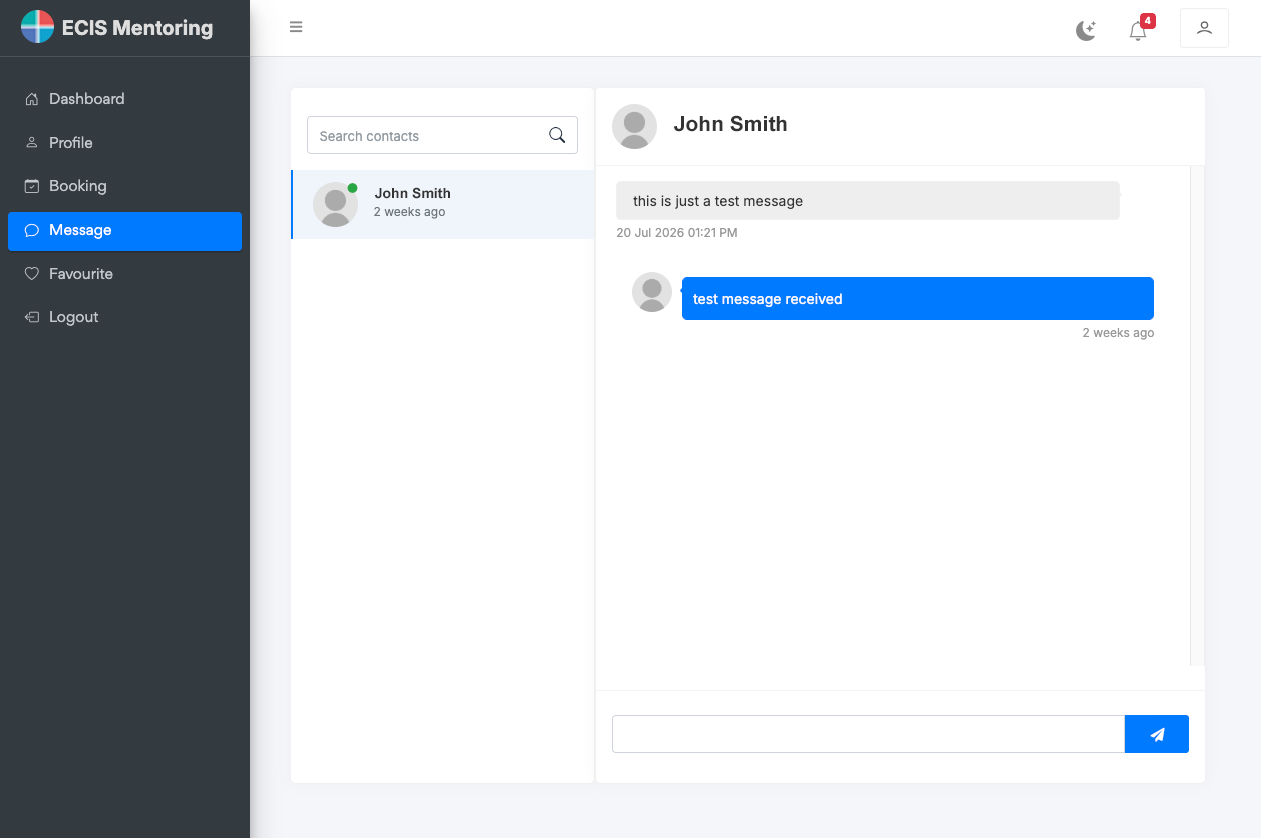
6.1 Starting a conversation↑
- From a mentor's profile, click the message icon.
- Type your message in the box that appears and click Send Message.
- The conversation will now appear under Dashboard ➜ Message for both parties, where you can continue the exchange.
6.2 Notifications↑
You'll receive an email notification when you get a new message, so you don't need to keep the platform open to know you've had a reply.
Section 07
Booking a Session
Booking a session is a multi-step flow that brings together a mentor's published Session and their weekly availability. Both sides of this are covered below.
7.1 Mentor setup↑
Mentors can create bookable session types under Dashboard ➜ Sessions ➜ Create New. Each session has:
- Session Name
- Duration (minutes)
- Details
- Session Type (one-off or recurring)
- Session Topic
- Optional intro video URL
- Status (Show / Hide)
- An optional Group Booking toggle, for sessions with more than one attendee
- Set Schedule — leave this as “Default Hours” to use the mentor's weekly availability; “Set Custom Hours” is a separate option to restrict this specific session to only certain days of the week
A session also needs to be linked to the mentor's availability (see Section 3.2.2, Schedule tab) before it can be booked.
Important
The mentor's weekly availability (Settings ➜ Schedule) must be built from individual time-slot entries — for example, sixteen separate 30-minute entries to cover a 9:00 AM–5:00 PM day — rather than one single entry spanning the whole day. Use Add new time repeatedly, once per slot, matching the session's duration. A single all-day entry will appear to work but produces a meaningless booking time.
7.2 For mentees: booking a session↑
- On a mentor's profile, under Sessions, select the session you'd like to book.
- Under “When should we meet?”, choose a date. Only dates matching the mentor's configured weekly availability are shown.
- Choose a specific time slot for that date.
- Click Go to Checkout, then Confirm Booking on the summary screen that follows.
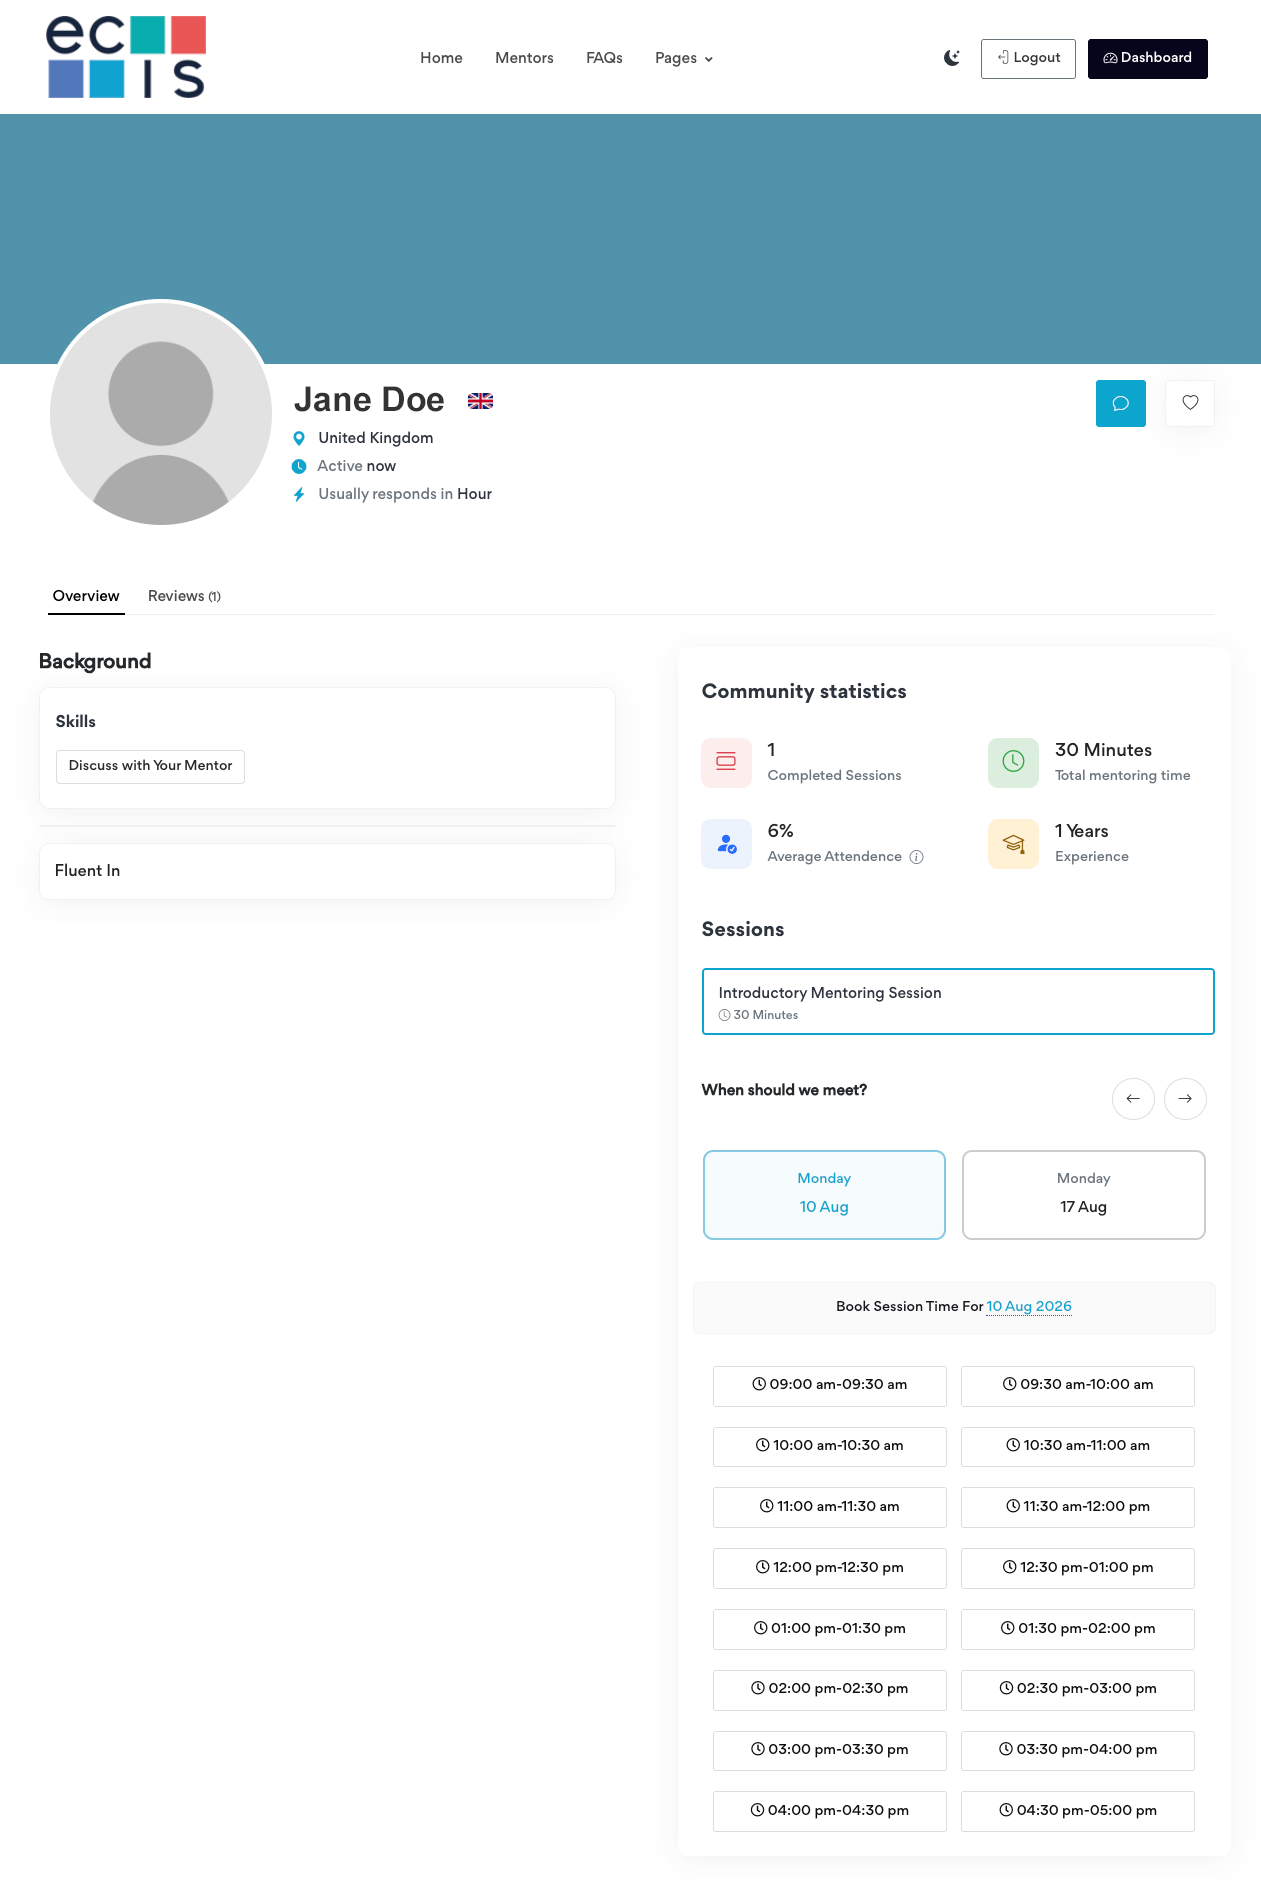
Once confirmed, the booking appears under Dashboard ➜ Booking for the mentee, initially with a status of Pending.
7.3 For mentors: managing bookings↑
Mentors see incoming bookings under Dashboard ➜ Bookings. Each booking can be moved between statuses using a dropdown in the Status column:
Changing the status here updates instantly for the mentee too, without needing to refresh.
Email notifications are sent automatically at both points in this flow: mentees receive a “Session Booking confirmation” email when they book, and a “Session Booking Update Confirmation” email when the mentor changes the booking's status (e.g. to Approved).
Section 08
Feedback & Ratings
Once a booking's status is changed to Completed (see Section 7.3), both the mentee and the mentor gain access to a rating and review feature for that session.
8.1 For mentees: leaving a review↑
- Go to Dashboard ➜ Booking and switch to the Completed tab.
- Open the action menu (…) on the completed booking and select Review.
- Choose a star rating from 1 to 5, add an optional written comment, and click Submit.
The review is published immediately — there is no approval step.
8.2 Where reviews appear↑
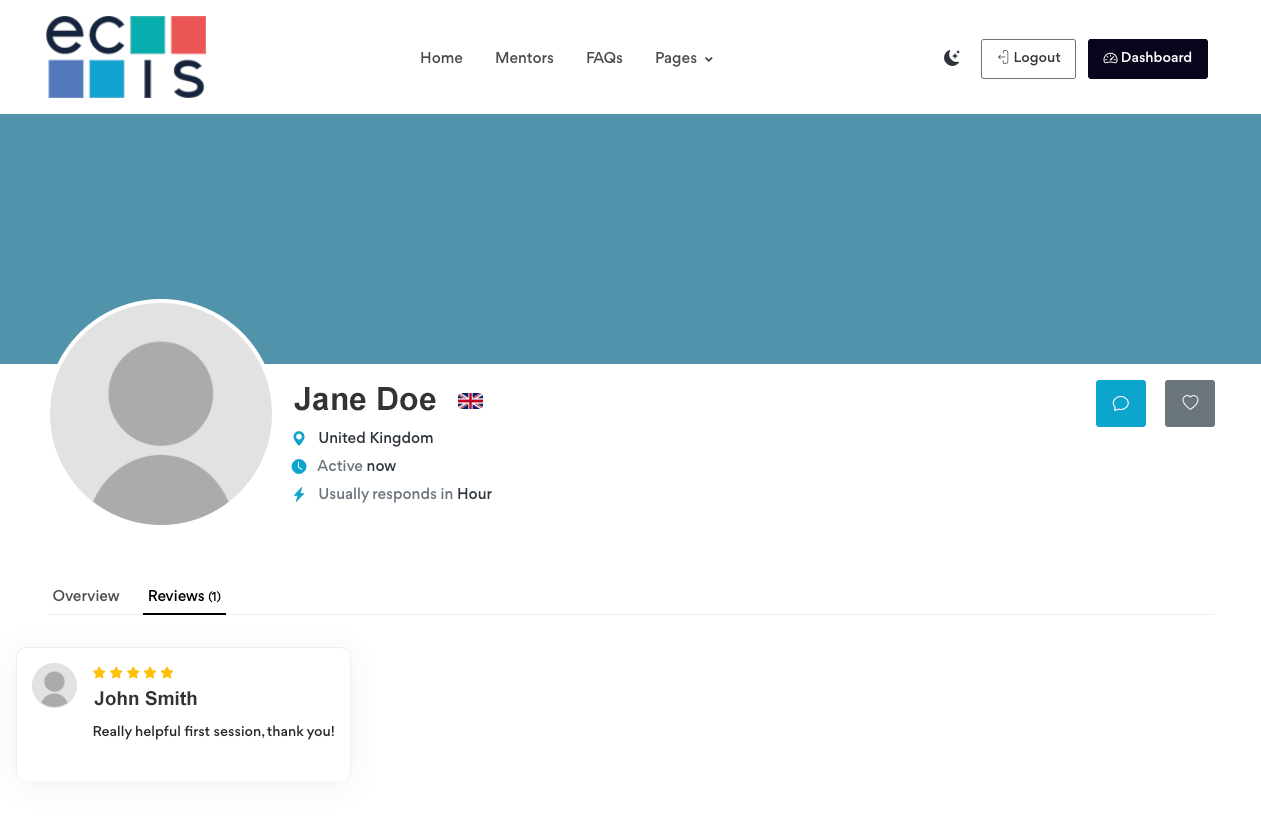
Submitted reviews appear on the mentor's public profile under a Reviews tab, alongside the star rating and the mentee's name. The mentor's Completed Sessions and Total mentoring time statistics on the same profile update automatically once a session is marked Completed.
8.3 For mentors: viewing ratings↑
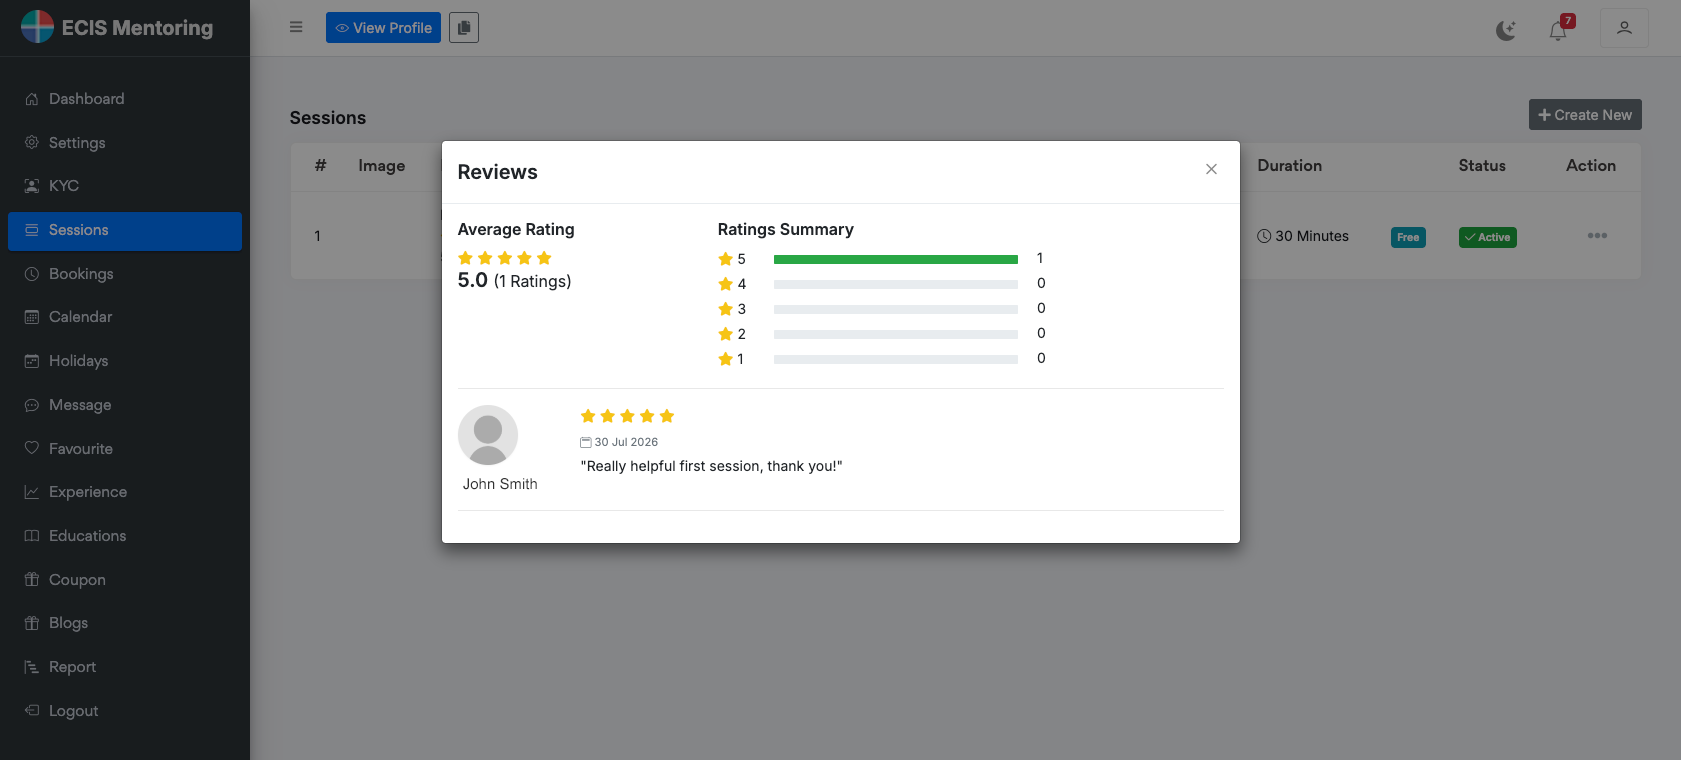
Mentors can see an aggregate view of all ratings for a given session type under Dashboard ➜ Sessions, via the action menu (…) ➜ Reviews. This shows the average rating, a breakdown of how many ratings fall into each star level, and the individual written reviews with their dates.
Section 09
Managing the Mentoring Relationship
- There's no fixed length for a mentoring relationship. A good starting point is around six months, then reassess.
- A monthly meeting is a reasonable default, though this is best agreed between mentor and mentee at your first conversation.
- Relationships focused on a specific short-term challenge may benefit from meeting more frequently; longer, broader relationships often work well with fewer, more spaced-out sessions.
Section 10
Frequently Asked Questions
What is mentoring?↑
Mentoring is the act of one person sharing their knowledge, skills, and experience to help another person develop and grow professionally. It's more flexible than coaching, and focused on the mentee's own career goals over a longer period, rather than a fixed set of short-term training goals.
Who can be a mentor?↑
Anyone with relevant experience or insight to share can be a mentor. This includes “reverse mentoring,” where a less experienced colleague mentors someone more senior — often bringing a valuable fresh perspective, including on diversity and inclusion topics.
How long should a mentoring relationship last?↑
There's no fixed rule. Many mentoring relationships run for a few months to a few years, depending on the mentee's needs. A six-month relationship is a reasonable starting point.
How often should I meet with my mentor or mentee?↑
Once a month is a reasonable general guide, though this should be agreed between mentor and mentee directly based on your goals.
Should I have both a mentor and a manager?↑
Yes — the two roles are complementary. A manager's focus is typically on organisational goals; a mentor's focus is on your own personal career progression.
Why should someone become a mentor?↑
Being a mentor is a valuable way to develop your own interpersonal and leadership skills, and is often seen as a strong first step toward formal management experience.
Section 11
Troubleshooting & Getting Help
11.1 “Your account is not active” when signing in↑
This means your registration is still awaiting approval. Wait for the approval email before trying to sign in again — see Section 2.5.
11.2 I selected a session but nothing appears to happen↑
Check with your mentor that they have configured actual weekly availability under Settings ➜ Schedule — without at least one enabled day with individual time slots, there is nothing to book. See Section 7.1.
11.3 Other issues↑
For anything not covered here, contact the ECIS team directly at mentoring@ecis.org.
End of guide
ECIS Mentoring Platform User Guide · Version 1.0 · 4th August, 2026